This post is about creating a Kubernetes cluster on Amazon Web Services.
As I’m studying to become a Certified Kubernetes Administrator, I needed a test Kubernetes cluster. As I’m a huge fan of Vagrant, the first thing that came to my mind was creating a Vagrant Kubernetes Cluster, but also being AWS certified, I wanted to build a Kubernetes cluster in AWS. At the moment Amazon EKS (Amazon Elastic Container Service for Kubernetes), which was announced at AWS Re:Invent 2017, is not yet available.
So here’s kops, which stands for Kubernetes Operations. At the moment it only supports creating Kubernetes clusters in AWS, but there’s already beta support for GCE and VMware vSphere is in alpha. Other platforms are planned as well.
Requirements
In order to work with kops some tools need to be installed on your system. Personally I use OSX, but all these tools can be installed on Linux. Windows is currently not supported. Also of course you need an AWS account. Bare in mind that Amazon will charge you for all the components that will be created. Install the following tools:
- AWS CLI
- kops
- kubectl
Information on how to install these tools can be found here.
As kops can also provide you with Terraform scripts, you could also install terraform, but that’s out of scope in this blogpost.
Another requirement is to have API credentials for an account that has permissions to create a new IAM account for kops. How to do this can be found here.
Creating an IAM user
The user that we are going to create needs the following IAM permissions:
- AmazonEC2FullAccess
- AmazonRoute53FullAccess
- AmazonS3FullAccess
- IAMFullAccess
- AmazonVPCFullAccess
First we will create the kops group:
aws iam create-group --group-name kops
Next step is to attach the needed permissions to the newly created group:
aws iam attach-group-policy --policy-arn arn:aws:iam::aws:policy/AmazonEC2FullAccess --group-name kops
aws iam attach-group-policy --policy-arn arn:aws:iam::aws:policy/AmazonRoute53FullAccess --group-name kops
aws iam attach-group-policy --policy-arn arn:aws:iam::aws:policy/AmazonS3FullAccess --group-name kops
aws iam attach-group-policy --policy-arn arn:aws:iam::aws:policy/IAMFullAccess --group-name kops
aws iam attach-group-policy --policy-arn arn:aws:iam::aws:policy/AmazonVPCFullAccess --group-name kops
Now we will create a user called kops:
aws iam create-user --user-name kops
Add the user kops to the group kops:
aws iam add-user-to-group --user-name kops --group-name kops
Last step is to create the API access keys for the kops user:
aws iam create-access-key --user-name kops
The last steps will provide you with a SecretAccessKey and an AccessKeyID. Make sure you copy these somewhere, is they are required in the next step. In my case the output the the last command was:
ACCESSKEY AKIAIIX6VVC5NR4MBTPA 2018-04-03T09:15:25.232Z jeoTDuaXDreQxb6zJC40Xwq73bq2WQ2fegdbhqgK Active kops
In the output above AKIAIIX6VVC5NR4MBTPA is the AccessKeyID and jeoTDuaXDreQxb6zJC40Xwq73bq2WQ2fegdbhqgK is the SecretAccessKey. By the way, don’t worry these keys are already deleted when you read this.
As you probably already have a user configuration for AWS in the directory ~/.aws, we are going to add the new API access keys to current configuration. This is called Named Profiles. Add the following lines to the file ~/.aws/credentails:
[kops]
aws_access_key_id=AKIAIIX6VVC5NR4MBTPA
aws_secret_access_key=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
Also changes the region and default output format in the file ~/.aws/config by adding the following lines:
[profile kops]
region = eu-central-1
output = text
Save both files and check if the profile is working with the following command:
aws iam list-users --profile=kops
If everything is done correctly, you should see a list of all IAM users, which you have configured in AWS.
If you want to use the kops profile, export the variable AWS_PROFILE, with the correct profile:
export AwS_PROFILE=kops
Now we can ommit the parameter --profile, when we use aws commands:
aws iam list-users
Should give you the same result as the previous command.
Configure DNS
As you may want to access your cluster, you need to configure DNS. Below I will describe a configuration where I have purchased a domainname via AWS Route 53. The domainname is linora-solutions.net.
In the AWS console go to the Route 53 page, and on the right side select the Hosted Zones:

Click on the Create Hosted Zone button to create a subdomain. In this example I’m going to name the subdomain k8s.linora-solutions.net:
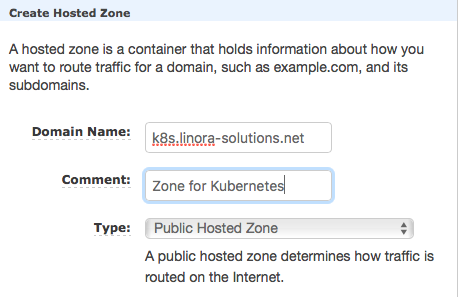
Click on the create button to create the Hosted Zone. The zone should be created:

Now select the Record Set of the type NS. On the right side of the screen, you will see the values for the name servers:
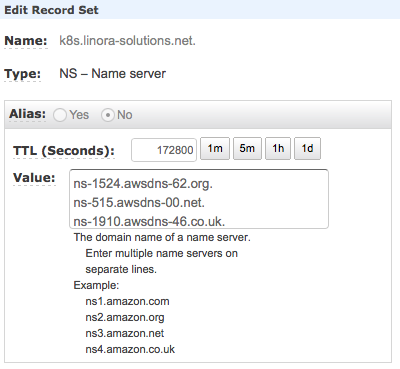
Copy the values of the nameservers to a text editor, cause we need them in the next step. Their should be 4 entries. Now click on the Back to Hosted Zones button on the top left corner. You should see your newly created Hosted Zone:

Select your main domainname and click on the Create Record Set button. We are going to add a NameServer record for our Kubernetes subdomain:
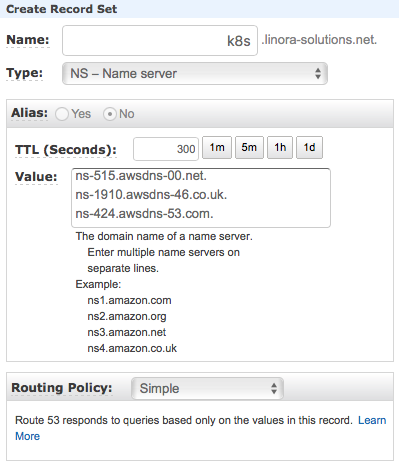
In the Name section, fill in the name of the subdomain and in the Value section, paste the nameservers you’ve copied before. Leave the Routing Policy as Simple. Click on the Create button, to create the record:

You can test your new subdomain with the following command:
$ dig +noall +answer ns k8s.linora-solutions.net
k8s.linora-solutions.net. 86400	IN	NS	ns-424.awsdns-53.com.
k8s.linora-solutions.net. 86400	IN	NS	ns-515.awsdns-00.net.
k8s.linora-solutions.net. 86400	IN	NS	ns-1910.awsdns-46.co.uk.
k8s.linora-solutions.net. 86400	IN	NS	ns-1524.awsdns-62.org.
It should return the nameservers for the subdomain.
Create Cluster State storage
To store the state of the cluster, we are going to create a dedicated S3 bucket for kops to use. We use the AWS CLI to create the bucket:
aws s3 mb s3://k8s.linora-solutions.net
List the bucket:
aws s3 ls
2018-04-03 13:39:48 k8s.linora-solutions.net
Creating our first cluster
Now that everything is setup the correct way, we can create first Kubernetes cluster. We’re going to use the kops command for that.
Get the availability zones of your region:
$ aws ec2 describe-availability-zones
AVAILABILITYZONES	eu-central-1	available	eu-central-1a
AVAILABILITYZONES	eu-central-1	available	eu-central-1b
AVAILABILITYZONES	eu-central-1	available	eu-central-1c
Create the cluster:
kops create cluster \
  --node-count 3 \
  --zones eu-central-1a,eu-central-1b,eu-central-1c \
  --node-size t2.medium \
  --master-count 1 \
  --master-zones eu-central-1a \
  --master-size t2.medium \
  --dns-zone k8s.linora-solutions.net \
  --state s3://k8s.linora-solutions.net \
  --name dev-cluster.k8s.linora-solutions.net
This will create a cluster with 1 master node and 3 worker nodes in the eu-central-1 region. The command will show you all the AWS resources that will be created. To really create the cluster use the kops update command:
kops update cluster dev-cluster.k8s.linora-solutions.net --yes --state s3://k8s.linora-solutions.net
Output of this command shows the following:
kops has set your kubectl context to dev-cluster.k8s.linora-solutions.net

Cluster is starting.  It should be ready in a few minutes.

Suggestions:
 * validate cluster: kops validate cluster
 * list nodes: kubectl get nodes --show-labels
 * ssh to the master: ssh -i ~/.ssh/id_rsa admin@api.dev-cluster.k8s.linora-solutions.net
The admin user is specific to Debian. If not using Debian please use the appropriate user based on your OS.
Now wait a couple of minutes and use the command kops validate cluster to check the status of the cluster:
$ kops validate cluster --state s3://k8s.linora-solutions.net
Using cluster from kubectl context: dev-cluster.k8s.linora-solutions.net

Validating cluster dev-cluster.k8s.linora-solutions.net

INSTANCE GROUPS
NAME			ROLE	MACHINETYPE	MIN	MAX	SUBNETS
master-eu-central-1a	Master	t2.medium	1	1	eu-central-1a
nodes			Node	t2.medium	3	3	eu-central-1a,eu-central-1b,eu-central-1c

NODE STATUS
NAME						ROLE	READY
ip-172-20-114-194.eu-central-1.compute.internal	node	True
ip-172-20-32-166.eu-central-1.compute.internal	node	True
ip-172-20-45-95.eu-central-1.compute.internal	master	True
ip-172-20-90-121.eu-central-1.compute.internal	node	True

Your cluster dev-cluster.k8s.linora-solutions.net is ready
With the kubectl command we can get the nodes of the cluster:
$ kubectl get nodes
NAME                                              STATUS    ROLES     AGE       VERSION
ip-172-20-114-194.eu-central-1.compute.internal   Ready     node      1m        v1.8.7
ip-172-20-32-166.eu-central-1.compute.internal    Ready     node      1m        v1.8.7
ip-172-20-45-95.eu-central-1.compute.internal     Ready     master    3m        v1.8.7
ip-172-20-90-121.eu-central-1.compute.internal    Ready     node      1m        v1.8.7
Check if all pods are running fine:
$ kubectl get pods --namespace=kube-system
NAME                                                                    READY     STATUS    RESTARTS   AGE
dns-controller-68b97db9c8-vd2qf                                         1/1       Running   0          3m
etcd-server-events-ip-172-20-45-95.eu-central-1.compute.internal        1/1       Running   0          3m
etcd-server-ip-172-20-45-95.eu-central-1.compute.internal               1/1       Running   0          3m
kube-apiserver-ip-172-20-45-95.eu-central-1.compute.internal            1/1       Running   0          3m
kube-controller-manager-ip-172-20-45-95.eu-central-1.compute.internal   1/1       Running   0          3m
kube-dns-7f56f9f8c7-jk8vw                                               3/3       Running   0          1m
kube-dns-7f56f9f8c7-l86pd                                               3/3       Running   0          3m
kube-dns-autoscaler-f4c47db64-gsjqs                                     1/1       Running   0          3m
kube-proxy-ip-172-20-114-194.eu-central-1.compute.internal              1/1       Running   0          2m
kube-proxy-ip-172-20-32-166.eu-central-1.compute.internal               1/1       Running   0          2m
kube-proxy-ip-172-20-45-95.eu-central-1.compute.internal                1/1       Running   0          3m
kube-proxy-ip-172-20-90-121.eu-central-1.compute.internal               1/1       Running   0          2m
kube-scheduler-ip-172-20-45-95.eu-central-1.compute.internal            1/1       Running   0          3m
Our cluster is ready for usage.
Deleting the cluster
As AWS charges money for all the created resources, it’s a good idea to remove the Kubernetes cluster after you’re done testing. Remove the cluster with the kops delete command:
kops delete cluster dev-cluster.k8s.linora-solutions.net --yes --state s3://k8s.linora-solutions.net
If you also want to remove the S3 bucket you created, use the aws s3 rb command:
aws s3 rb s3://k8s.linora-solutions.net --force
Also remove the IAM user and group kops. Use your IAM admin account for that:
export AwS_PROFILE=default
aws iam remove-user-from-group --group-name kops --user-name kops
aws iam delete-access-key --user-name=kops --access-key $(aws iam list-access-keys --user-name=kops |awk '{print $2}')
aws iam delete-user --user-name kops
aws iam detach-group-policy --policy-arn arn:aws:iam::aws:policy/AmazonEC2FullAccess --group-name kops
aws iam detach-group-policy --policy-arn arn:aws:iam::aws:policy/AmazonRoute53FullAccess --group-name kops
aws iam detach-group-policy --policy-arn arn:aws:iam::aws:policy/AmazonS3FullAccess --group-name kops
aws iam detach-group-policy --policy-arn arn:aws:iam::aws:policy/IAMFullAccess --group-name kops
aws iam detach-group-policy --policy-arn arn:aws:iam::aws:policy/AmazonVPCFullAccess --group-name kops
aws iam delete-group --group-name kops
Now everything that we have build is removed.